
One of the biggest concerns holding people back from buying a neon sign is the fear of damaging their walls during installation. Whether you rent an apartment, live in a dorm, or simply want to avoid patching holes later, the good news is that installing neon signs without damaging walls is not only possible—it is simple, secure, and supported by modern mounting technology.
In 2026, the majority of LED neon signs are designed with renters and homeowners in mind. They are lightweight (typically 1-5 pounds), run on low-voltage power, and can be mounted using several fully removable methods. A damage-free neon sign installation takes less than 15 minutes and leaves zero trace when you decide to move or rearrange your space.
1. Adhesive Mounting Strips (Best for Smooth Walls)
Heavy-duty removable adhesive strips are the most popular solution for installing neon signs without damaging walls. Products like Command strips or museum-grade acrylic adhesive pads can hold neon signs weighing up to 10 pounds on painted drywall, tile, glass, and finished wood. Clean the wall surface with isopropyl alcohol, apply the strips to the back of the sign’s mounting frame, press firmly for 30 seconds, and let the adhesive cure for one hour before hanging. To remove, simply stretch the strip downward—it releases cleanly without residue or paint damage.
4. Wire Hanging Kits (Best for Ceilings and Tall Walls)
For suspending a neon sign from the ceiling or mounting on a wall with existing picture railings, an adjustable wire hanging kit provides a clean, floating look. The neon sign size guide recommends wire suspension for signs over 30 inches wide, as the distributed weight reduces stress on any single mounting point. Use a single wire for centered signs or two wires for larger signs. The cables are nearly invisible, creating the illusion that the sign is floating in mid-air.
2. Brick Clips for Masonry Walls
For brick, concrete, or stone walls, brick clips are the no-drill solution. These spring-loaded metal clips grip the recessed mortar joints between bricks, providing a secure anchor point for screw hooks or adhesive strips. A single brick clip can hold up to 25 pounds, more than enough for any standard LED neon sign. Brick clips are fully removable and leave zero marks on the brick or mortar.
3. Tension Rod Method (Best for Window Frames)
If you want your neon sign in a window without blocking the view or damaging the frame, a tension rod installation is ideal. Choose a window frame with at least one inch of depth on each side. A tension rod neon sign installation works perfectly for apartment windows, storefront displays, and dorm rooms. The sign hangs from the rod using clear fishing line or included hanging loops, creating a floating display that is visible from both inside and outside.
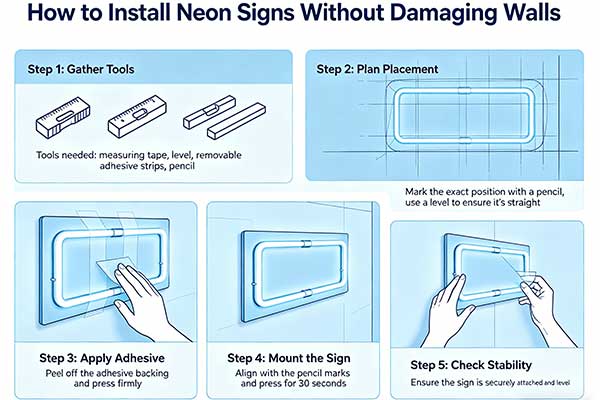
5. Command Hook Hacks for Lightweight Signs
For the most accessible damage-free installation, a pair of medium-sized Command hooks (rated for 5 pounds each) can support most small to medium neon signs. Spacing the hooks at the sign’s mounting points distributes weight evenly. This method is especially useful for neon signs for small spaces and apartment-friendly setups. The hooks release cleanly when pulled straight down and leave no residue.
6. Cable Management for a Clean Look
A damage-free installation is only complete when the power cable is managed cleanly. Use adhesive cable clips painted to match your wall color to run the cable along baseboards or door frames. For ceiling-mounted signs, route the cable along the ceiling-wall junction and use white cable clips that blend with the trim. Avoid stapling or nailing cables—stick-on clips are 100% removable and keep your installation truly damage-free.
Related Articles
- How to Hang Neon Signs on Brick Without Drilling
- Neon Signs for Small Spaces: Apartment Decor Ideas
- Dorm Room Neon Signs: 10 Bright Ideas
- Bedroom Neon Sign Ideas: Transforming Your Sanctuary
7. Frequently Asked Questions (FAQ)
Will adhesive strips damage my paint?
Quality removable strips are designed to lift cleanly when stretched. Test on a small area first. For delicate or antique wall finishes, use the wire hanging method instead.
How much does a damage-free installation cost?
Adhesive strips cost $5-10 for a pack. Wire hanging kits cost $10-20. Brick clips cost $8-15 per pair. Total cost is typically under $25 for a complete installation.
Can I install a neon sign on textured walls?
Yes. For orange peel or light texture walls, adhesive strips still work well. For heavy texture like popcorn or stucco, wire hanging or brick clips are better options.
Will the sign fall off over time?
No, when properly installed with the correct weight-rated adhesive. Ensure the wall surface is clean and dry before application, and follow the manufacturer’s cure time (usually 1 hour) before hanging.
8. Conclusion
Installing a neon sign without damaging your walls is simple, affordable, and completely achievable with the right tools. From adhesive strips for painted drywall to brick clips for masonry, there is a damage-free solution for every wall type. Follow these methods, and you can enjoy your neon glow with total peace of mind.
7. Surface Preparation for Damage-Free Installation
Proper surface preparation is the foundation of any successful damage-free neon installation. Start by thoroughly cleaning the mounting area with isopropyl alcohol to remove dust, grease, and residues that compromise adhesive performance. Allow the surface to dry completely—minimum 30 minutes for painted walls, 60 minutes for porous surfaces. For textured walls, test adhesive strength on an inconspicuous area first, as rough textures reduce contact surface area by up to 40%. Temperature matters: adhesives bond best at room temperature (65-75°F), so avoid installations in cold rooms or near heating vents. After applying adhesive mounts, press firmly for 30 seconds and wait 24 hours before hanging your sign to achieve maximum bond strength. For smooth surfaces like glass, tile, or glossy paint, adhesive strips provide excellent hold. For matte or flat paint, consider using clear silicone adhesive dots that remove cleanly with gentle heat from a hair dryer. Always test removal on a small area first to verify the paint finish won’t peel. These preparation steps take just a few extra minutes but dramatically reduce the risk of damage or sign failure.
Looking for the perfect neon sign for your needs? Check out our cherish every moment – living room mantel for sentiment, our cozy vibes only – reading nook & relaxation corner, or our welcome neon sign – for home business entryway & front door to find exactly what you’re looking for.