
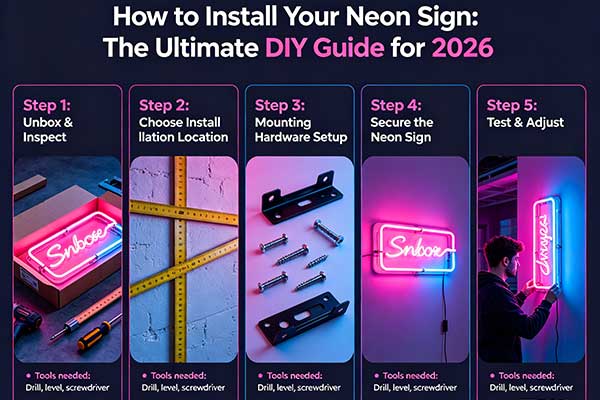
Bringing a neon glow into your home or business is one of the most transformative interior design moves you can make. However, the excitement of unboxing your custom piece often turns into “installation anxiety.” How do you ensure it is level? Will it fall off the wall? How do you hide those pesky wires?
Related products: LED Neon “Welcome” Sign for Storefront Window Glass, LED Neon Cupcake Sign – Wall, Welcome Neon Sign – For Home Business Entryway & Front Door.
In 2026, the DIY installation of LED neon signs has become significantly more accessible due to lightweight acrylic backings and advanced mounting hardware. For 95% of home projects, wall-mounting with stainless steel standoffs is the gold standard for a professional, “floating” look. While hanging via chains is faster, a fixed wall mount provides superior stability, reduces the risk of accidental breakage by 40%, and allows for cleaner cable management.
The best part is that you do not have to choose between a great look and a landlord-friendly finish. Most LED neon signs weigh just 1 to 5 pounds, run on low-voltage power, and can be fixed with fully removable hardware. A clean, damage-free installation usually takes less than 15 minutes and leaves zero trace when you move or rearrange the space. This guide covers every method, from the professional standoff mount to no-drill renter solutions, plus the cable, power and maintenance details that separate a neat install from a messy one.
1. Pre-Installation Checklist: Don’t Drill Yet!
Before you pick up the power drill, you need to conduct a “bench test.”
- The Power Test: Plug your sign in as soon as it arrives. Check for any flickering or dead segments. It is much easier to exchange a sign before it is bolted to your wall.
- The Weight Check: Modern LED neon signs weigh approximately 1.5 to 2.5 lbs per square foot. Ensure your wall type (drywall, plaster, or brick) can support the specific weight of your unit.
- The Reach: Measure your lead wire. Most signs come with 6-10 feet of cabling. If your preferred spot is further from an outlet, you will need to plan for a discreet extension cord or a nearby power source.
- The Surface Check: Identify what you are mounting onto. Smooth painted drywall, glass, tile and finished wood all take adhesive mounts well. Brick, concrete and stone need clips or drilled anchors, while heavy texture (popcorn or stucco) is best served by wire hanging.
2. Method 1: The Professional “Floating” Mount (Standoffs)
This is the most popular method for 2026, and the one we recommend for most indoor installations. Standoffs are small metal cylinders that create a gap between the sign and the wall, allowing the light to “wash” behind the sign for a more dramatic effect.
Steps:
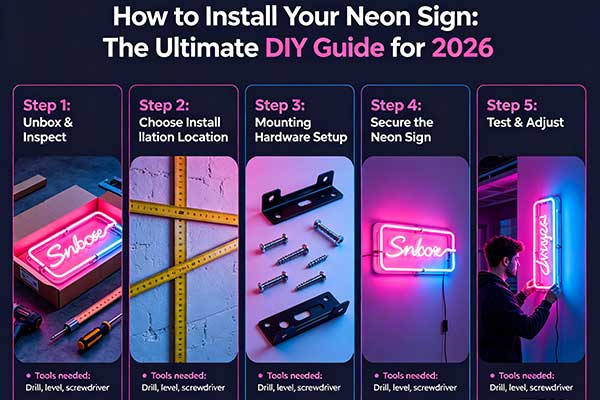
- Template Alignment: Most premium signs come with a paper template. Tape this to the wall using painter’s tape. Use a bubble level to ensure it is perfectly straight.
- Mark the Holes: Use a pencil to mark the center of the pre-drilled holes in the acrylic backing.
- Drill and Anchor: Remove the template. Drill holes and insert the provided wall anchors (standard plastic anchors for drywall).
- Install the Bases: Screw the base of the standoffs into the anchors.
- Secure the Sign: Place the sign over the bases and screw on the “caps” by hand.
3. Method 2: The “Gallery” Hang (Chains or Cables)
If you are a renter or want to hang your sign in a window, the chain method is your best friend. It requires no drilling, so the wall stays exactly as it was.
| Feature | Standoff Mounting | Chain Hanging |
| Effort Level | Medium (Requires Drilling) | Low (Hook & Hang) |
| Visual Style | Modern/Clean | Industrial/Retail |
| Permanent? | Yes (Leaves holes) | No (Portable) |
| Best For | Feature Walls | Windows / Over Bars |
Pro Tip: Use clear fishing line (50lb test) instead of metal chains if you want the sign to look like it is magically hovering in a window.
For ceilings or tall walls with existing picture rails, an adjustable wire hanging kit gives the same clean, floating look with even more flexibility. The neon sign size guide recommends wire suspension for signs over 30 inches wide, because the distributed weight reduces stress on any single mounting point. Use a single wire for centered signs or two wires for larger signs. The cables are nearly invisible, creating the illusion that the sign is floating in mid-air.
4. Damage-Free Installation: Installing Neon Signs Without Damaging Walls
One of the biggest concerns holding people back from buying a neon sign is the fear of damaging their walls during installation. Whether you rent an apartment, live in a dorm, or simply want to avoid patching holes later, the good news is that installing neon signs without damaging walls is not only possible, it is simple, secure, and supported by modern mounting technology.
Surface Preparation Comes First
Proper surface preparation is the foundation of any successful damage-free installation. Start by thoroughly cleaning the mounting area with isopropyl alcohol to remove dust, grease, and residues that compromise adhesive performance. Allow the surface to dry completely, a minimum of 30 minutes for painted walls and 60 minutes for porous surfaces. For textured walls, test adhesive strength on an inconspicuous area first, as rough textures reduce contact surface area by up to 40%.
Temperature matters too: adhesives bond best at room temperature (65-75 degrees F), so avoid installations in cold rooms or near heating vents. After applying adhesive mounts, press firmly for 30 seconds and wait 24 hours before hanging your sign to achieve maximum bond strength. For smooth surfaces like glass, tile, or glossy paint, adhesive strips provide excellent hold. For matte or flat paint, consider using clear silicone adhesive dots that remove cleanly with gentle heat from a hair dryer. Always test removal on a small area first to verify the paint finish will not peel.
1. Adhesive Mounting Strips (Best for Smooth Walls)
Heavy-duty removable adhesive strips are the most popular solution for installing neon signs without damaging walls. Products like Command strips or museum-grade acrylic adhesive pads can hold neon signs weighing up to 10 pounds on painted drywall, tile, glass, and finished wood. Clean the wall surface with isopropyl alcohol, apply the strips to the back of the sign’s mounting frame, press firmly for 30 seconds, and let the adhesive cure for one hour before hanging. To remove, simply stretch the strip downward. It releases cleanly without residue or paint damage.
2. Brick Clips for Masonry Walls
For brick, concrete, or stone walls, brick clips are the no-drill solution. These spring-loaded metal clips grip the recessed mortar joints between bricks, providing a secure anchor point for screw hooks or adhesive strips. A single brick clip can hold up to 25 pounds, more than enough for any standard LED neon sign. Brick clips are fully removable and leave zero marks on the brick or mortar. If you are mounting on exposed brick, our guide to hanging a neon sign on brick without drilling walks through the whole process.
3. Tension Rod Method (Best for Window Frames)
If you want your neon sign in a window without blocking the view or damaging the frame, a tension rod installation is ideal. Choose a window frame with at least one inch of depth on each side. A tension rod neon sign installation works perfectly for apartment windows, storefront displays, and dorm rooms. The sign hangs from the rod using clear fishing line or included hanging loops, creating a floating display that is visible from both inside and outside.
4. Wire Hanging Kits (Best for Ceilings and Tall Walls)
For suspending a neon sign from the ceiling or mounting on a wall with existing picture railings, an adjustable wire hanging kit provides a clean, floating look. Wire suspension is recommended for signs over 30 inches wide, as the distributed weight reduces stress on any single mounting point. Use a single wire for centered signs or two wires for larger signs.
5. Command Hook Hacks for Lightweight Signs
For the most accessible damage-free installation, a pair of medium-sized Command hooks (rated for 5 pounds each) can support most small to medium neon signs. Spacing the hooks at the sign’s mounting points distributes weight evenly. This method is especially useful for neon signs for small spaces and apartment-friendly setups. The hooks release cleanly when pulled straight down and leave no residue.
5. Cable Management: Hiding the “Tail”
The biggest difference between a DIY project and a professional install is the wire. A dangling black cord can ruin the aesthetic, and a damage-free installation is only complete when the power cable is managed cleanly.
- Cable Clips: Use small, clear adhesive cable clips to run the wire along the edge of the acrylic or down the corner of a wall.
- Wall Channels: For a permanent look, use paintable “D-Line” cable raceways. You can paint them the exact same color as your wall to make the wire virtually disappear.
- Baseboards and Trim: Use adhesive cable clips painted to match your wall color to run the cable along baseboards or door frames. For ceiling-mounted signs, route the cable along the ceiling-wall junction and use white cable clips that blend with the trim.
- The “Behind the Wall” Route: If you are comfortable, you can drill a small hole behind the sign and fish the wire through the drywall to an outlet below. Note: Check local fire codes in 2026 regarding “in-wall” rated cables before doing this.
Avoid stapling or nailing cables. Stick-on clips are 100% removable and keep your installation truly damage-free.
6. Managing Your Glow: Dimming and Power
In 2026, light pollution and “circadian lighting” are huge trends, so being able to tune your sign’s output matters more than ever.
- The Dimmer Advantage: A neon sign at 100% brightness is often too intense for a living room movie night. Using a Remote Dimmer (typically 12V) allows you to drop the brightness to 10% for a subtle nightlight effect.
- Smart Integration: Plug your sign into a smart plug (like Alexa or Google Home). You can set a routine: “Hey Google, it’s party time,” to have your neon sign and music turn on simultaneously.
7. Maintenance for Longevity
LED neon is durable, but it is not “set and forget.”
- Dusting: Use a feather duster or a soft microfiber cloth. Never use Windex or harsh chemicals on the acrylic, as it can cause “crazing” (tiny micro-cracks) over time.
- Heat Dissipation: Ensure there is at least a 5mm gap between the sign and the wall (standoffs handle this naturally). This prevents the power transformer from overheating and extends the life of the LEDs to the full 100,000-hour potential.
When it is time for a deeper clean or you need to store the sign between seasons, follow our cleaning and storage tips to avoid clouding the acrylic or stressing the wiring.
8. Commercial and Custom LED Sign Installation
When you are installing a sign for a business rather than a bedroom, the priorities shift. Foot traffic, visibility from the street, and safety compliance all come into play. Custom LED sign installation for a restaurant, bar, or retail space usually means larger panels, longer cable runs, and a mounting height that keeps the sign above head level.
For commercial projects, a fixed drilled mount is almost always the right call. Standoffs or direct screw mounting hold up to daily use far better than adhesive, and a permanent install lets you hide the wiring properly instead of running it along a skirting board. If you are fitting out a hospitality venue, our restaurant neon sign installation guide covers tool lists, safety checks and the practical sequence for a busy space.
Very large signs need a different approach again. Wide, heavy panels benefit from a backing frame or a multi-point mounting system so the weight is spread across the wall rather than concentrated on two holes. For these projects, see our notes on large-format commercial installations. Whichever route you take, confirm the environment rating first: indoor signs are not sealed against moisture, so a sign near a kitchen pass, a pool, or an outdoor terrace needs an appropriate IP rating before you mount it.
Frequently Asked Questions
Q1: Can I hang my neon sign with Command Strips?
While LED neon is light, we do not recommend standard Command Strips for anything larger than a small icon (under 12 inches). The heat from the LEDs, though minimal, can eventually weaken the adhesive, leading to your sign falling and cracking. If you must use them, use the Heavy-Duty Velcro version and check it monthly.
Q2: What do I do if my neon sign won’t turn on after I’ve mounted it?
Don’t panic! Check the “DC Jack” connection (where the sign wire meets the power adapter wire). This is the most common point of failure. It often pulls slightly loose during the hanging process. Ensure it is pushed in firmly and that the outlet is live.
Q3: Can I install my neon sign in a bathroom?
Only if the sign is IP65-rated (Water-Resistant). Standard indoor neon signs are not sealed against steam and humidity. Over time, moisture can corrode the internal LED connections, causing the sign to fail prematurely. Always check the “Environment Rating” before installing in a bathroom or near a pool.
Q4: Will adhesive strips damage my paint?
Quality removable strips are designed to lift cleanly when stretched. Test on a small area first. For delicate or antique wall finishes, use the wire hanging method instead.
Q5: How much does a damage-free installation cost?
Adhesive strips cost $5-10 for a pack. Wire hanging kits cost $10-20. Brick clips cost $8-15 per pair. Total cost is typically under $25 for a complete installation.
Q6: Can I install a neon sign on textured walls?
Yes. For orange peel or light texture walls, adhesive strips still work well. For heavy texture like popcorn or stucco, wire hanging or brick clips are better options.
Q7: Will the sign fall off over time?
No, when properly installed with the correct weight-rated adhesive. Ensure the wall surface is clean and dry before application, and follow the manufacturer’s cure time (usually 1 hour) before hanging.
Final Thoughts
Installing a neon sign without damaging your walls is simple, affordable, and completely achievable with the right tools. From adhesive strips for painted drywall to brick clips for masonry, there is a damage-free solution for every wall type, and a drilled standoff mount for anyone who wants the cleanest possible finish. Follow these methods, and you can enjoy your neon glow with total peace of mind.
Looking for the perfect neon sign for your needs? Check out our respawn – competitive gaming corner, our explore. dream. discover. – kids’ study & creativity corner, or our game on – gaming setup background for gamers & streamers to find exactly what you’re looking for.